Symbolic Execution with Angr - part 2
Table of Contents

Overcoming path explosion, injecting bitvectors into symbolic registers using angr
Introduction #
In the previous blog, we looked into what Symbolic Execution is and how we can utilize the Angr framework in finding execution paths to reach desirable states in programs. In this blog, we will look at the limitations that Symbolic Execution imposes and how we can use Angr to efficiently navigate through these limitations. We shall also introduce symbolic registers and how to inject symbols directly into registers.
Path Explosion #
In our previous example, we had a simple program with only 2 possible execution paths, one printing out “good job” while the other “try again”.
In a more practical case with a complex program with very many states, execution paths grow exponentially. In the case of unbounded loops in the program, we could even have infinite execution paths making it unfeasible to analyze all these paths. This is the problem of path explosion
Let us see how we can overcome path explosion in the second binary example using Angr
02_angr_find_condition #
This is the 3rd binary file in the exercise
➜  02_angr_find_condition git:(master) ✗ ls
02_angr_find_condition.c.jinja  generate.py  __init__.py  scaffold02.py
➜  02_angr_find_condition git:(master) ✗
Run the binary to see its functionality.
➜  dist git:(master) ✗ ./02_angr_find_condition
Enter the password: asdasd
Try again.
It is similar to the previous binary that we looked at. Let us disassemble the main function of the binary in Cutter to get more information.
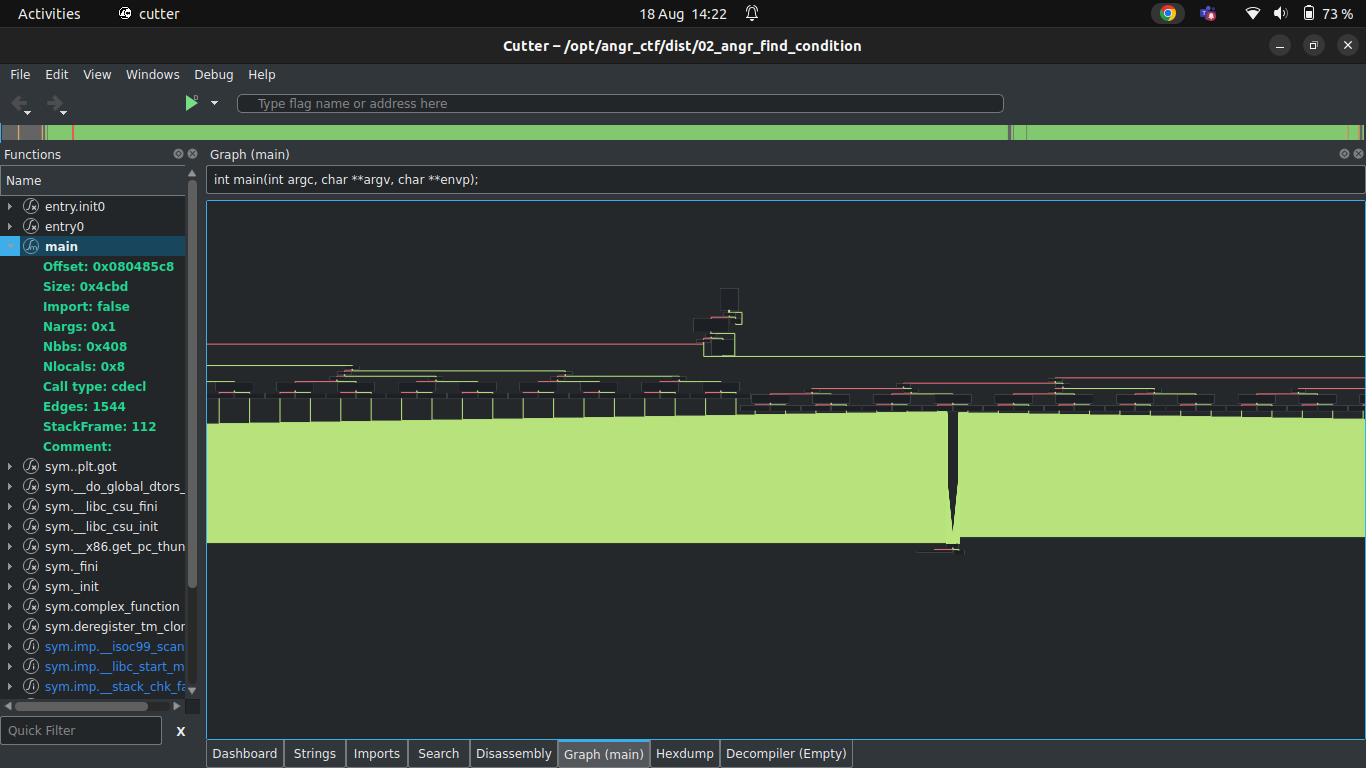
Well, it’s a bloody mess.
There are tonnes of branches leading to several ‘Try again’ and ‘Good job’ states.
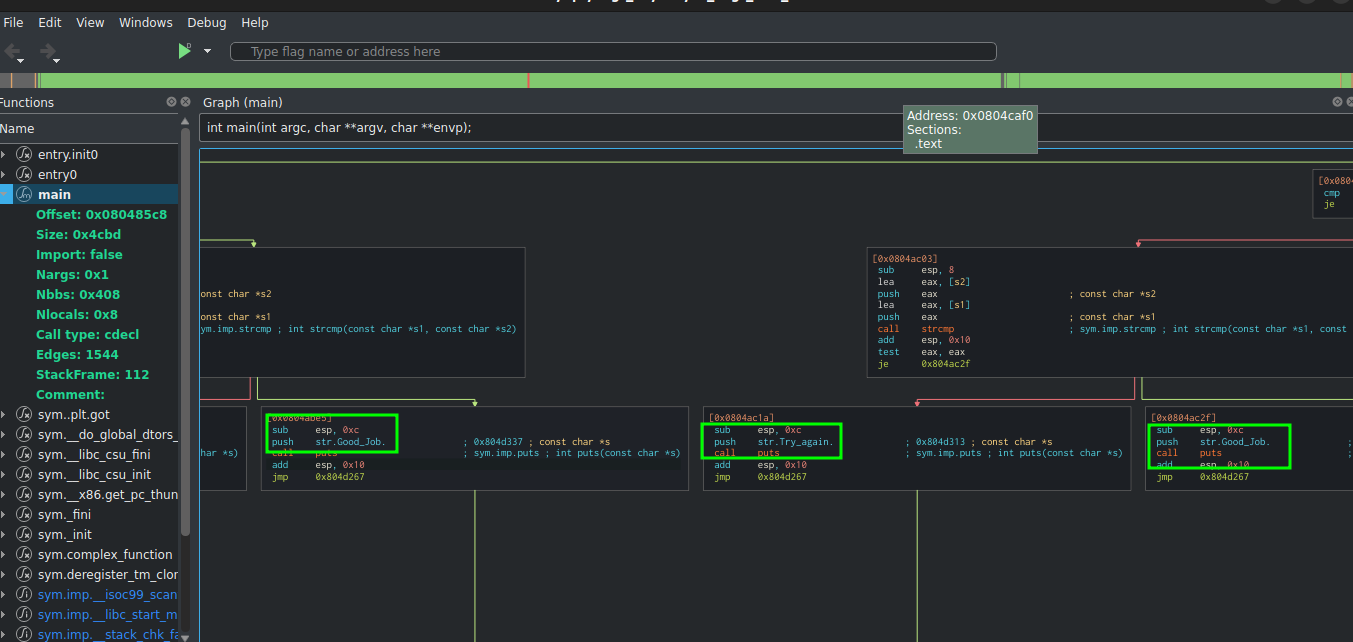
It would be tedious noting down the addresses of all Good job states. Instead, we can tell Angr to avoid or consider a state based on the output that the state gives.
There is a scaffold.py file in each binary file’s directory that contains skeleton code that will guide you in your solution. We will slightly modify the skeleton code to come up with our solution.
Solution #
- Import necessary libraries & set up an Angr project.
import angr
import sys

def main():
    path_to_binary = '/opt/angr_ctf/dist/02_angr_find_condition'
    project = angr.Project(path_to_binary)
    print("[+] Loaded the binary to angr")
    initial_state = project.factory.entry_state()
    simulation = project.factory.simgr(initial_state)
- Building out the logic
    def successful(state): #1
        stdout_output = state.posix.dumps(sys.stdout.fileno()) #2
        if b'Good Job.' in stdout_output: #3
            return True

    def abort(state):
        stdout_output = state.posix.dumps(sys.stdout.fileno())
        if b'Try again.' in stdout_output:
            return False
The 2 functions defined - successful and abort, carry out our program’s logic. They simply check if you have found the state that you are looking for.
We begin by defining our function which is going to take in a state#1. We then take what is printed to stdout and assign it to the stdout_output variable #2. The output of state.posix.dumps is a python bytes object, so we use b’ ‘ to capture the string ‘Good job’ from the stdout_output variable and return True if found #3.
We do the same for the abort function where we check for the ‘Try again’ string.
- Exploring code paths
simulation.explore(find=successful, avoid=abort)
We can then tell Angr what states to explore and what to avoid exploring. simulation.explore has 2 arguments, find and avoid. They take in an address or a list of addresses. Our program is going to start exploring based on those functions that accept a state and return whether it matches or not
- House-keeping
    if simulation.found:
        solution_state = simulation.found[0]
        solution = solution_state.posix.dumps(sys.stdin.fileno())
        print("[+] Solution found! : {}".format(solution.decode('utf-8')))
    else:
        raise Exception("Could not find the solution")

if __name__ == "__main__":
    main()
We finish up by printing the solution once the simulation manager finds the desired state.
Our final script:
import angr
import sys

def main():
    path_to_binary = '/opt/angr_ctf/dist/02_angr_find_condition'
    project = angr.Project(path_to_binary)
    print("[+] Loaded the binary to angr")
    initial_state = project.factory.entry_state()
    simulation = project.factory.simgr(initial_state)

    # define a function that checks if you have found the state you are looking for

    def successful(state):
        # dump what the binary has printed out into a string
        stdout_output = state.posix.dumps(sys.stdout.fileno())
        if b'Good Job.' in stdout_output:
            return True

    def abort(state):
        stdout_output = state.posix.dumps(sys.stdout.fileno())
        if b'Try again.' in stdout_output:
            return False

    simulation.explore(find=successful, avoid=abort)

    if simulation.found:
        solution_state = simulation.found[0]
        solution = solution_state.posix.dumps(sys.stdin.fileno())
        print("[+] Success! Solution is: {}".format(solution.decode('utf-8')))

    else:
        raise Exception("Could not find the solution")


if __name__ == "__main__":
    main()
Run the code:

We get our solution :)
03_angr_symbolic_registers #
Let’s crank up the difficulty and see more Angr functionality! We proceed to disassemble our binary.
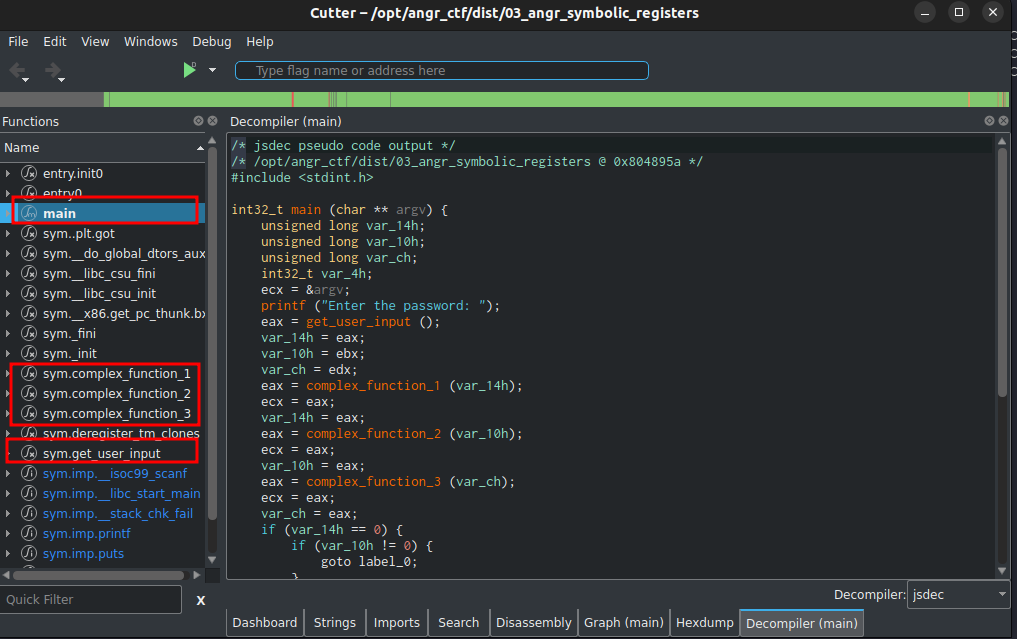
Various functions are of interest. We can begin by inspecting the main() function. Cutter gives us a nice decompiled output that can help us understand better what our program does under the hood.
Program analysis #
First, we can let us get a general overview of what happens in the main function to understand the functionality of the program
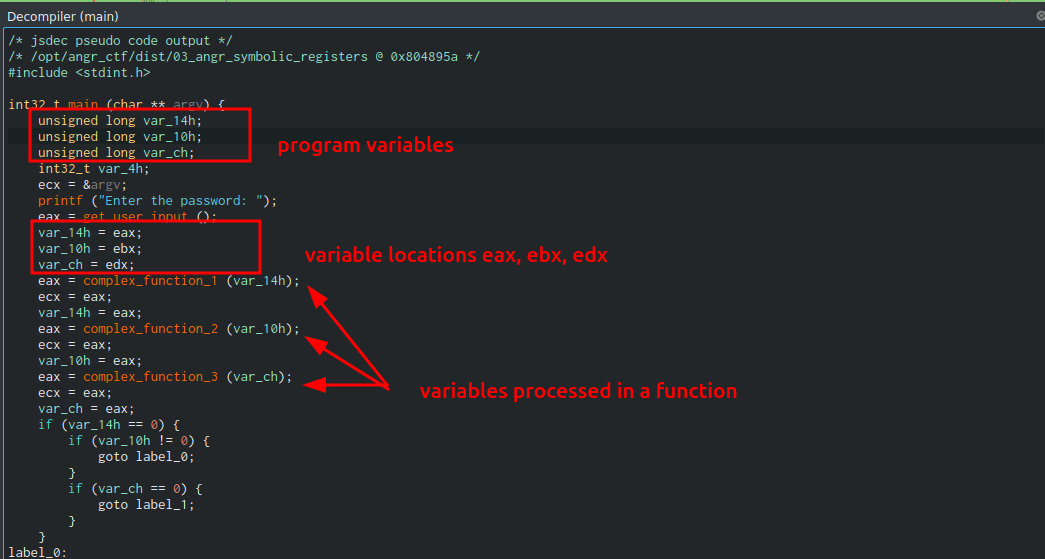
There are 3 variables that get initialized in the main function. Technically 4, but we ignore int32_t var_4h as it is used for other procedures out of scope in this tutorial.
Immediately after initializing, there is a call to get_user_input() function which we will have a look at shortly. Our input is stored in the 3 variables which are placed in registers eax, ebx, edx and the complex_function functions are used to perform some operations on these variables.
Let us have a look at the get_user_input() function
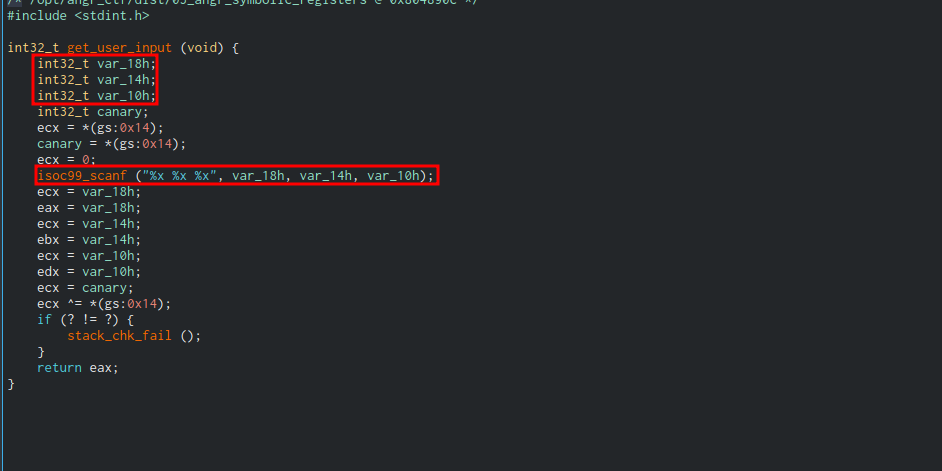
In the scanf function, we can see these 3 badboys - “%x %x %x”, which means that we are taking 3 inputs as hexadecimal numbers. These are the values moved to the registers we noted earlier.
So how are we going to approach our exploit? Let us walk through step by step
- Import necessary libraries & set up an Angr project
import angr
import sys
import claripy

def main():
    path_to_binary = '/opt/angr_ctf/dist/02_angr_find_condition'
    project = angr.Project(path_to_binary)
    print("[+] Loaded the binary to angr")
We have an additional library claripy different from before. We will see its usage later.
- Initialize the starting address.
In the previous examples, we had Angr start at the beginning of the program. But due to Angr’s functionality, format strings are not handled well and we need to skip the call to scanf that specified the %x format strings to pick our hex input.
Right after the get_user_input(), we pick the address of the next instruction

which is 0x08048980
start_address = 0x08048980
initial_state = project.factory.blank_state(addr=start_address)
Note that we used blank_state() instead of entry_state(). This effectively creates a new address that will be the starting point for Angr
- Symbol injection into registers.
Remember the 3 registers that we noted earlier (eax, ebx, edx)? We are going to replace the value inside the register (which we don’t know) with our symbol, by injecting into it. Before doing so, let us look at a key concept: Bitvectors - simply put, it is an array of bits.
Our registers are 32 bits in length, so our variables are going to be just as much long, represented as bitvectors.
This will look as follows:
    size = 32
    pass1 = claripy.BVS('pass1', size)
    pass2 = claripy.BVS('pass2', size)
    pass3 = claripy.BVS('pass3', size)
Note that we now make use of the claripy library to create our bitvectors which uses the BVS method(bitvector symbol).
Let us now take our symbols and inject them into the registers. We are going to set the registers based on the starting address initial_state, which essentially marks the registers.
    initial_state.regs.eax = pass1
    initial_state.regs.ebx = pass2
    initial_state.regs.edx = pass3

    simulation = project.factory.simgr(initial_state)
- House-keeping
Our routine functions for finding the states we need and should avoid.
    def successful(state):
        stdout_output = state.posix.dumps(sys.stdout.fileno())
        if b'Good Job.' in stdout_output:
            return True;

    def abort(state):
        stdout_output = state.posix.dumps(sys.stdout.fileno())
        if b'Try again.' in stdout_output:
            return True

    simulation.explore(find=is_successful, avoid=should_abort)
- Prepare the output
There is a possibility of getting multiple solutions. solution_state.solver.eval ensures that we pick one solution for each symbol and also, formats it into a hexadecimal value
if simulation.found:
solution_state = simulation.found[0]
pass1 = format(solution_state.solver.eval(pass1), 'x')
pass2 = format(solution_state.solver.eval(pass2), 'x')
pass3 = format(solution_state.solver.eval(pass3), 'x')
solution = pass1 + " " + pass2 + " " + pass3 + " "
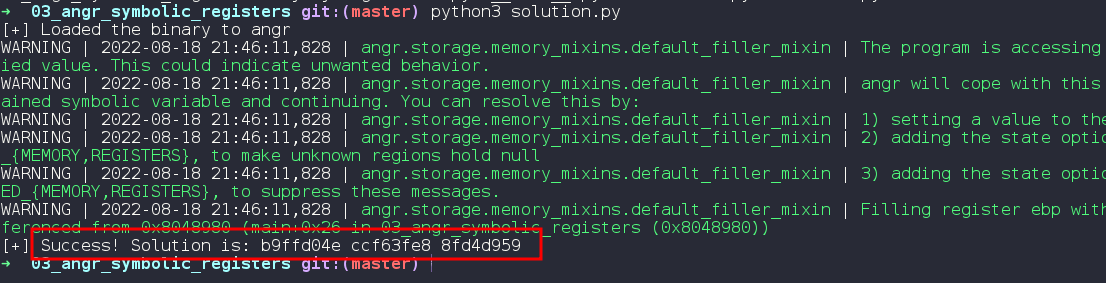
print("[+] Success! Solution is: {}".format(solution))
else:
raise Exception("Could not find the solution")
if __name__ == "__main__":
main()
Solution #
Our final script
import angr
import sys
import claripy

def main():
    path_to_binary = '/home/saudi/Desktop/CTF/angrchalls/angr_ctf/dist/03_angr_symbolic_registers'
    project = angr.Project(path_to_binary)
    print("[+] Loaded the binary to angr")
    base_address = 0x8048980
    initial_state = project.factory.blank_state(addr=base_address)

    size = 32
    pass1 = claripy.BVS('pass1', size)
    pass2 = claripy.BVS('pass2', size)
    pass3 = claripy.BVS('pass3', size)


    initial_state.regs.eax = pass1
    initial_state.regs.ebx = pass2
    initial_state.regs.edx = pass3

    simulation = project.factory.simgr(initial_state)

    def successful(state):
        stdout_output = state.posix.dumps(sys.stdout.fileno())
        if b'Good Job.' in stdout_output:
            return True;

    def abort(state):
        stdout_output = state.posix.dumps(sys.stdout.fileno())
        if b'Try again.' in stdout_output:
            return True

    simulation.explore(find=successful, avoid=abort)
    if simulation.found:
        solution_state = simulation.found[0]
        pass1 = format(solution_state.solver.eval(pass1), 'x')
        pass2 = format(solution_state.solver.eval(pass2), 'x')
        pass3 = format(solution_state.solver.eval(pass3), 'x')

        solution = pass1 + " " + pass2 + " " + pass3 + " "
        print("[+] Success! Solution is: {}".format(solution))

    else:
        raise Exception("Could not find the solution")

if __name__ == "__main__":
    main()
Our solution :)
We come to the end of the tutorial having covered some more advanced concepts. See you in the next where I take you through hell :)